Change of hypervisor is a major change for IT organisations. Conversion of virtual machines can be automated, but in some cases, the job has to be done manually, sometimes resulting in major downtime.
A migration from Nutanix AHV to VMware ESXi is such a migration. Sometime backup tooling like Veeam can help, but downtime is involved. This post describes the manual process.
The proces in broad terms is as follows.
- Shutdown the Virtual Machine
- Converting the disks using qemu-img
- Mounting Nutanix container as datastore to ESXi
- Change the newly created disk(s) with vmkfstools
- Create the VM using vCenter or hostinterface ESXi
step 1: shutdown the virtual machine
To make sure you have consistent data on your disk, it is best to gracefully shutdown your virtual machine. Please also write down the number of vCPU, RAM, as well as the connected network(s). You need that information while creating the virtual machine in the VMware infrastructure.
step 2: converting the disk(s)
Converting disks is something to do from the commandline. The procedure described is not preferred for production environments as running qemu-img is bad for the overall performance of the CVM and therefore bad for the storage performance of the AHV host.
To get the storage paths for the disk, we have to get that information using the following command.
acli vm.get [name of the vm] include_vmdisk_paths=true | grep nfs_pathnutanix@NTNX-19FM6H310106-B-CVM:172.17.0.83:~$ acli vm.get template-2025 include_vmdisk_paths=true | grep nfs_path
vmdisk_nfs_path: “/nexxt-container01/.acropolis/vmdisk/a790fcb3-e8ad-4e29-b0d9-96be375eea4d”
Now we know the path of the disk, we can convert the disk using qemu-img.
qemu-img convert -O vmdk nfs://127.0.0.1/[disk_path_source] nfs://127.0.0.1/[container]/newdisk.vmdk
nutanix@NTNX-19FM6H310106-B-CVM:172.17.0.83:~$ qemu-img convert -O vmdk nfs://127.0.0.1/nexxt-container01/.acropolis/vmdisk/a790fcb3-e8ad-4e29-b0d9-96be375eea4d nfs://127.0.0.1/nexxt-container01/template-2025-disk0.vmdk
After the job has finished, you can always check for the presence of the file with nfs_ls.
nutanix@NTNX-19FM6H310106-B-CVM:172.17.0.83:~$ nfs_ls /nexxt-container01
NTNX-172-17-0-50-PCVM-1763749235.iso
template-2025-disk0.vmdk
Step 3: Mounting the Nutanix container to ESXi
To use the newly created, the fastest way to use this on ESXi, is to mount to container as a NFS datastore.
By default external hosts do not have access to the containers. To allow external access, the Filesystem whitelist needs to be modified. This has to be done globally or on container-level in the Prism UI. I prefer to make those changes on container-level to be sure that not all containers are exposed to the outside.
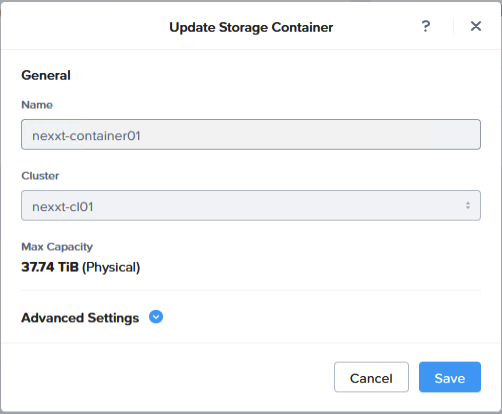
When you are using Prism Central to update the container, you see something like this. The filesystem whitelist is found under the ‘Advanced Settings’.
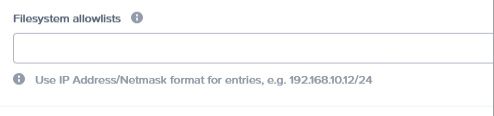
When expanding with the blue arrow, you have to scroll down to the end.
In this box, you have to fill in the IP address and the netmask for the ESXi vmkernel port you are going to use.
Step 4: Converting (again) the disk with vmkfstools
When converting a disk with qemu-img, the result will be a thin-formatted disk. However, when using the disk directly for your VM, this will result in an error, while powering on the disk.
To resolve this, we have to change the disk with vmkfstools on the command-line of the ESXi host. Enable ssh on the ESXi host and logon with the root account. Navigate to the datastore where the VMDK disk resides and issue the following command.
vmkfstools -i diskname.vmdk new_diskname.vmdk
Step 5: Create the VM
In this last step, you can create the VM. After powering on the VM, you can test it. If everything is okay, you just initiate a sVmotion to migrate the virtual machine to another datastore so the VM no longer resides on the Nutanix container.
Leave a Reply